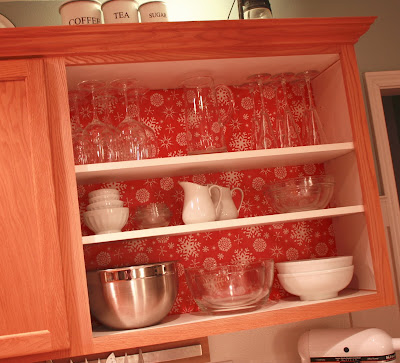
That's a lot to fit into one post...I know!
But I can't wait to show you what I found...

and it's all related, so it all has to go together. But let's start at the beginning...
I don't know if you've ever noticed, but I never take photos of our kitchen to post on here. It's not that it's a horrible kitchen or anything. It's just not "us".
You know?
It's one of the last places in the house that needs to have some work done to it. I'm not talking major remodel (although, you know we already have plans for that in the future!), but just easy, little fixes that can be done to make it more ours...and not so reminiscent of the people that lived here before us.
Right before Christmas we decided to make a small change. We have a bank of cabinets that looks like this...
 A big, closed wall of Oak.
Secretly, my real reason for wanting the change was to get a new look, but I needed to appeal to Will from a different angle. So I went with functionality. The builder got it wrong when they planned out these cabinets. The cabinet to the right of the microwave opened from the right side, not the left. Weird. The cabinets over the counter opened from the center, but because of the angle of the counter when you stand in front of it it was a long reach to get anything out of it. Luckily, I'm tall, so it wasn't a huge issue, but honestly, it just didn't make sense.
With that, I was able to convince Will that it was better to have no cabinet doors, rather than one's that weren't working for us. We also flipped the cabinet door to the right of the microwave so that it would open on the left side. A simple fix that we should have done a long time ago.
And...down came the cabinet doors on the end.
I wanted a background color or pattern for the now exposed back of the cabinet, but nothing permanent. I wanted to be able to change it as often as I like.
Gift wrap was the obvious choice and because it was Christmas time, I had a ton of options for what I could choose. The boys chose the red with the snowflakes, so I put it up...

It was easy enough.
Ok really, it was kind of a pain, but if you have the time to put into it and enough patience, then you end up getting a lot of bang for your buck!
Fast forward to three days ago...
I told myself when I put up the snowflake paper in December that I would be able to leave it up through the winter. The reality is that I am craving Spring (maybe even Summer) like nobody's business!
It had to go.
So I bought a vibrant turquoise wrapping paper to add a big dose of summery color into our kitchen.
Ok, pay attention...
here comes the "How To" and "How NOT To" all wrapped up in one...
(Ha! No pun intended.)
I carefully took the snowflake paper off the back of the cabinets to use as the template for cutting my new paper. I figured it would save me a step in not having to measure the cabinets again...
 The *moment* that I unrolled it I knew I had a big problem. The paper was thin - too thin to be used in this kind of application, and it had rolled out into a long stretch of wavy paper. And, on top of that, the paper was shiny and what I really needed was a paper that had a more matte finish so that it wouldn't show all of the flaws that would occur when I was hanging it, taping it up, and fitting it into place.
It's just like with paint. If you want to disguise the flaws in your walls you use flat paint, not shiny...otherwise your flaws scream "look at me!"
Not what I was going for.
But I was not willing to give up on the project, so I came up with what I hoped would be a solution.
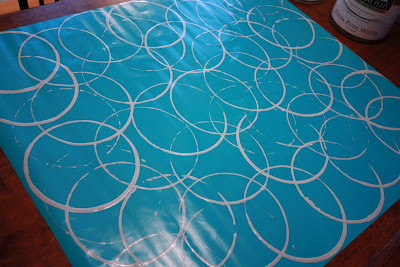
I decided to paint the solid colored paper with a random pattern of my liking.
I got out the can of paint that I used in our Living Room, a dinner plate and a big, souffle dish.

I taped down the four corners of the paper onto my kitchen table and got to work.
This part was fun and easy. Because I wanted the pattern to be random, I didn't have to worry about exactly where to place the circle.
Once I felt like it was good, I stepped back and...I didn't love it.

How did it turn out?
Better.
Keeping in mind that there would be two shelves with dishes and glasses in front of it, I decided that it would be good...

I set up a fan at the back of the table to make sure it was good and dry before I tried to hang it up...

Until the next morning, when daylight hit the shiny, ripply paper and...
well, just see for yourself:
 I had put up the plain blue paper in our glass cabinets to give it a pop of color, as well.
It was bad too.
Ughh!
I should have gone with my gut in the beginning.
Lesson learned:
Thin, shiny paper is NOT good for using as a background in open cabinets.
The problem is that you can't always tell what you're going to get from a roll of wrapping paper at the store.
Bummer.
It all had to come down!
It did not look good and no amount of trying to convince myself that it was ok was going to change that. The goal was to make the kitchen look good. Even great! Not worse.
So I did the only thing I could think of.
I went to Hallmark.
I know they have good paper. Thick and pretty.
What I did not know was that they had THIS...

Seriously!
(Insert the image of clouds parting and the sound of angels singing - here!)
It was like it was all meant to be.
Adhesive backed paper meant that I wouldn't have to worry about getting the paper on the wall just right to line up with the tape and make sure it was flat and laid out as perfect as it could be.
I was so excited to get it home and try it out!
I was a little worried when I opened it up because it turned out to be shiny paper. Yikes. Shiny paper gave me horrible results last time. But knowing that the entire piece would be sticking to the back of my cabinet, instead of only the spots that had been taped up, gave me hope.
In typical Hallmark fashion, the paper had cut lines on the back, so it was so easy to cut out the paper to the exact size that I needed it to be...

I stood on the chair, got on my knees up on the counter and pressed it into place.
Now, I don't want you to think that I'm yelling at you, except that I have to tell you...
IT WAS SO EASY!!

So easy.
It is perfectly flat, except where there are flaws in our cabinetry. But you would have to look closely to really see them. I see them only because I am now intimately familiar with the inside of our cabinets.
I put the shelves back in place, and all of the dishes back in and Viola, a whole new look...


Here you can see just how shiny the paper is, but turns out we actually like it. The shiny, reflective quality makes the kitchen feel lighter and brighter.
Bonus!


Would you believe me if I told you that this morning we were actually trying to figure out where else we could take doors off of cabinets?
We like it that much.


So there you have it:
A "How To" paint gift wrap to make your own custom paper.
(I will be doing this again. But this time to use as gift wrap. I think making unique paper for your friends and family would make gifts that much more special.)
A "How NOT To" hang cheap, thin, shiny gift wrap in your open cabinets.
(Whatever you do, do not try this at home! Thin gift wrap is barely good for wrapping gifts, much less wrapping cabinets.)
And a brand new find that knocked my socks off!
(I wish you could all see it in person! It's just so pretty!)
The adhesive paper turned a project that was kind of a pain to get right, into something easy enough that I would let my 8 year old do it. He'd do a good job too!
So? Are you feeling inspired? Gonna go get some Adhesive Gift Wrap of your own and make the back of your cabinets prettier than you ever thought they could be?
If you do, I want to see.
And good luck!
Although, you won't need it...
so simple, I tell you!

P.S. I am posting this at:
Transformation Thursday, Strut Your Stuff Thursday, Fireflies and Jellybeans,
A "How To" paint gift wrap to make your own custom paper.
(I will be doing this again. But this time to use as gift wrap. I think making unique paper for your friends and family would make gifts that much more special.)
A "How NOT To" hang cheap, thin, shiny gift wrap in your open cabinets.
(Whatever you do, do not try this at home! Thin gift wrap is barely good for wrapping gifts, much less wrapping cabinets.)
And a brand new find that knocked my socks off!
(I wish you could all see it in person! It's just so pretty!)
The adhesive paper turned a project that was kind of a pain to get right, into something easy enough that I would let my 8 year old do it. He'd do a good job too!
So? Are you feeling inspired? Gonna go get some Adhesive Gift Wrap of your own and make the back of your cabinets prettier than you ever thought they could be?
If you do, I want to see.
And good luck!
Although, you won't need it...
so simple, I tell you!
P.S. I am posting this at:
Transformation Thursday, Strut Your Stuff Thursday, Fireflies and Jellybeans,


